-lw-scaled.png.png)
How To Back Up Your Photos & Videos When Travelling - A Definitive Guide

Whenever you set off on your travels, you probably take your smartphone and perhaps a digital camera with you to photograph and film the remarkable people, architecture, food, wildlife, waterfalls, landscapes, cityscapes, festivals and other visual spectacles that you expect to witness during your trip.
You might not place tremendous value on the media files that you're capturing at the time, but they are in fact highly precious and worth protecting for several reasons.
First of all, they may well be the only record that you'll have of that trip, the only tangible evidence that it ever happened.
If anybody ever doubts your seemingly far-fetched travel tales, those files are handy as irrefutable proof that you're not fabricating them.
Secondly, photos and video clips forever preserve the details of a trip that your mind forgets and are the best way to jog those faded travel memories in the future, mentally transporting you back to that blissful time in your life.
Those files will undoubtedly be a source of endless surprise and delight for you in later years.
Thirdly, photos and videos are also the best way to share the highlights of your trip with friends and family.
Verbal tales of your escapades can only get you so much engagement, but when you show people a powerful image or a video clip, they can better relate and understand what you experienced.
And for some people, there's also a very practical reason to preserve all this data; they need it to write a travel memoir, create a travel blog, start a YouTube channel, create a photo gallery or produce a documentary.
But the harsh truth is that if you don’t protect all that data carefully, you may lose all those precious files long before you reach a ripe old age and quite possibly even before your trip has ended.
If you’ve ever lost files from a past trip before, you know that dreadful sinking feeling that hits you like a freight train the moment you realize what has happened.
Losing that irreplaceable data is almost as bad as losing a part of yourself and it’s something you want to avoid at all costs.
The good news is that all your digital images can be preserved more or less indefinitely, provided that you back them up the right way from the beginning.
Back them up the wrong way however, or even worse, not at all, and you stand a reasonable chance of losing all that precious data before you even make it home.
In this article, we’re going to cover the ins and outs of backing up your data while travelling but first I want to briefly discuss the basic principle of data backup and why you really need to be backing up your files as you create them, long beforeyou get home.
What is data backup & why do you need to do it when you're travelling?

Backing up your data means that you create copies of all your precious photos, videos and other files, and store all these files in separate, safe locations.
Ideally you want to have the original and two copies of all your files stored in three separate locations, though having just one redundant copy is better than only having the original.
The primary reason you need to back up every file is because data that's only stored in one location just isn’t secure enough for you to be able to rely on.
When you’re travelling there are countless ways that you could lose all the original photos and videos that you took before your trip even draws to a close. To mention just a few of these ways:
- SD cards can get lost and corrupted.
- Smartphones can get dropped in the toilet.
- External hard drives can spontaneously fail.
- Laptops can get lost, stolen or damaged.
- Malware can infect devices and wipe all the data from them.
- Files can get accidentally deleted or just disappear randomly.
- USB flash drives can get left behind in cybercafes.
- Fires can burn down guesthouses along with travellers' stuff (and data)
Lauren Juliff from Never Ending Footsteps has had her fair share of photo-related catastrophes, which resulted in her losing a lot of invaluable data.
She shattered an SD card filled with images, had a hard drive fail at the bottom of her bag and dropped her phone in the toilet, losing two weeks worth of photos.
One of my own SD cards (containing several hundred photo and video files from a recent trip to the Philippines) recently got corrupted while I was copying all the files from the card over to my external hard drive.
All of the photos and videos that were on the card at the time got completely erased before I had even copied half of them over to the hard drive. The data vanished from the card without a trace.
Now luckily I was able to recover all the deleted photos using a piece of free open source recovery software called TestDisk, which I highly recommend.
The videos, however, were recovered in a fragmented file format and I have not been able to figure out how to make them playable again.
A second less obvious reason why you should back up your files is because it will probably keep haunting you if you don’t.
Your mind will periodically generate pangs of uneasiness to remind you that your precious files are not backed up and could disappear at any moment. For the peace of mind alone, it’s worth backing up your data.
Alright, now that you understand why backing up your data while travelling is so important, I'll now show you the various strategies that I recommend for doing so.
We'll cover how to back up from camera memory cards, how to back up from mobile devices, the best cloud storage options for travellers and how to put your files into permanent storage when you get home from a trip.
Let's get started.
How to back up from an SD card when you're travelling with a laptop

We will later discuss ways to backup your photos and videos without a laptop, but travelling with one does give you a lot more options.
The reality is that most data storage devices, like USB flash drives and external hard drives, are not designed to be directly connected to an SD card, as they don't possess SD card slots.
A laptop however, with its USB ports and SD card slots, can act as a hub or intermediary for transferring files from a memory card to a storage device. The memory card and storage device can be connected to the laptop at the same time and files can then be copied between them.
Laptops also usually come with a decent amount of storage capacity of their own and if you haven't already used up that drive space, you can use it to hold backups of your files.
Other than carrying a laptop, the foundation of a sound data backup strategy is to carry SD cards with enough total storage capacity to last you the duration of your trip.
The idea is that whenever you fill up an SD card with photos and videos, you swap it out for a new empty card, leaving all the files on the filled card.
You then just keep repeating this process until the end of your trip and you should never have to format (erase) any of the cards to make new space during the trip.
This way your SD cards hold the original of all the photos and videos you took during the trip and you can then make a second (and preferably third) backup copy to any of the following locations:
Directly to a laptop
Many modern laptops have an SD card slot where you can insert your camera’s SD card directly into the machine and then copy your photos and videos from the card to the laptop's internal hard drive.
If your laptop doesn’t have such a slot you’ll usually need to buy an SD card reader device that plugs into one of the USB ports of your laptop.
Anker makes a good one with fast data transfer rates (5 Gbps) that can read SD cards and microSD cards at the same time.
Laptops used to be very cumbersome machines to travel with but in the past few years we’ve seen the emergence of Ultrabooks and other ultra-thin and ultralight laptop models that weigh less than 1 kg.
My own laptop for example, the 11 inch Macbook Air, weighs just 2.38 lbs (1.08 kg), and is so small, thin and light that I find it a joy to bring it with me in my carry-on whenever I go overseas.
If even this sounds too big, there are smaller laptops than this, like the 10" Microsoft Surface Go or the 7" GPD Pocket 2.
While a compact laptop is a great backup solution for a while, no internal hard drive has unlimited storage space and it’s possible that you will eventually run out, as happened to me.
If or when that day comes, you may wish to shift your files onto a dedicated data storage device like an external hard drive.
To a larger memory card
SD cards just seem to keep getting bigger and bigger with 512 GB cards already on the market and plans from SanDisk to release a 1TB SDXC card some time in the near future.
One backup strategy that some travellers employ is to carry one very large memory card for backup purposes, and multiple smaller capacity cards for everyday shooting.
The idea is that any time you fill up one of the smaller memory cards, you swap out the card for a new empty one, leave all the files there on the old card and then copy them over to the large memory card to create a backup.
The actual task of copying the photos over to the backup memory card should be easy enough with a laptop at your disposal.
If you can only connect one memory card at a time you will have to first copy the files to the laptop's internal drive and then copy them from that to the second card.
If your camera has dual memory card slots you may also be able to write the images you're shooting to the two cards, with one of those obviously being the backup card.
One combination of cards that could work well in practice might be eight 32 GB cards for all your regular shooting and then one 256 GB backup card.
To implement this strategy you’ll need to have an idea of how many photos you’re going to take during your trip and how big each photo is going to be so that you can buy memory cards with sufficient capacity.
The advantage of using an SD card to backup your photos is that it’s unlikely to break if you drop it onto a hard surface, as might happen to an external hard drive, for example.
The drawback with SD cards is that they can still get crushed or damaged in other ways and they’re small enough to get lost easily.
The other issue is that SD card storage costs more per MB than external hard drive storage.
Taking everything into consideration, this backup strategy wouldn't be our number one choice.
To a USB flash drive

USB flash drives can have a staggering capacity of up to 2 TB these days and make for a really lightweight, compact and ultra-portable backup drive for all the photos and videos you take during your trip.
Coping files from your camera’s SD card onto a USB flash drive is pretty straightforward when you have a laptop or a computer.
Once both devices are mounted simultaneously on your machine you should be able to copy folders and files from one to the other as you please.
The drawback with using USB sticks for storage is again that they cost more per MB than external hard drives.
They’re also still small enough to lose and it’s easy to forget to remove a USB stick from a computer when you’re using it to print off documents in a cybercafé or printing shop.
To an external hard drive

External hard drives are compact portable storage devices that you can carry with you wherever you go.
Generally people buy them in capacities ranging from 1 to 4 TB, though you can buy drives with capacities of 10 TB and higher.
An external hard drive is what we currently use to back up all our photos and videos on the road and the specific model we carry is the Toshiba Canvio Basics 2TB, which is also available in 1TB,3TB and 4TB capacities.
We crossed the point of having more photos and videos than our laptops could ever possibly hold a few years back and we chose an external hard drive as our backup solution because they're cheaper per MB than most other storage options.
Also, external hard drives are physically large enough that we wouldn’t worry about losing them as much as we would worry about losing an SD card or a USB flash drive.
To the cloud

The problem with using two or more physical storage devices (SD card + laptop, SD card + USB stick, etc.) as your sole backup strategy on the road, is that if some misfortune like fire, flood or theft suddenly strikes and takes out one of your storage devices, there’s a very good chance it’ll take out the other one too.
Cloud backups keep a copy of your data on a remote Internet server in a completely separate location that’s not connected to the events you’re experiencing on your travels, so it gives you an extra layer of protection for your files.
Jodi Ettenberg of Legal Nomads learned the value of having a cloud backup the hard way when her partner’s apartment was robbed.
The thieves took her Macbook Pro laptop along with a 500 GB hard drive, a netbook and a 32 GB flash card, and these three storage devices held the only three backups of all her travel photos.
Of course, cloud backups can be less feasible when you’re travelling in parts of the world with poor Internet connectivity, since in scenarios like these it can be impossible to back up new photos to the cloud as fast as you’re taking them.
But if you do happen to be travelling somewhere with reasonably fast and reliable Internet, then cloud backups are definitely viable and you should be using them to afford additional protection to your files.
Some cloud backup options are free while others are paid, and some providers offer both free and paid options.
The free plans tend to severely limit storage space, upload speeds and additional features, but can serve many travellers up to a point, especially those that won't be abusing their camera's shutter-release button.
It's also possible to get by for a while with free cloud storage if you’re willing to sign up to multiple providers in order to take advantage of all the free cloud storage available to you. 10 GB of storage here and 50 GB there can start to add up.
Free cloud backup options
Google Photos- Google Photos lets you store unlimited "high quality" photos at resolutions of 16 MP or below, and videos at 1080p or below. You can have Google compress photo and video files that are larger than this to 16 MP or 1080p.
If you want to store “original size” photos or videos at higher resolutions, they will contribute to your 15 GB free storage allowance, which is shared between your Google Photos, Google Drive and Gmail accounts.
Dropbox - With a basic Dropbox account you get 2 GB of free storage space. You can also get an additional 500 MB per referral and can earn up to 16 GB in extra storage in this way.
Microsoft OneDrive- Microsoft OneDrive gives you 5 GB of free storage in the basic plan.
iCloud- Apple users get 5 GB of free storage with iCloud, which can be mostly allocated to photo storage
pCloud- This company gives you 2GB of free cloud storage for signing up and then lets you easily earn another 8 GB by performing a few simple tasks like referring the service.
Amazon Drive - If you happen to be an Amazon Prime Member you get unlimited photo storage with Amazon Drive at no additional cost, and 5 GB of video storage. If you're not a Prime member, you're out of luck.
Degoo - Degoo gives users a whopping 100 GB of free cloud storage. You can also get an additional 3 GB for each referred user, up to a maximum of 500 GB. The free plan also supports backing up content from an unlimited number of devices, including mobile devices.
Mega - This cloud storage provider gives users 15 GB of free storage and then an additional 35 GB that expires after 30 days. The 15 GB is at least yours to keep forever.
Paid cloud storage options
When it comes to paid cloud storage options you can usually count on getting a lot more space to play with, faster upload speeds and a couple of useful extra features.
Most travellers will be served very well by the personal plan with the cloud backup service Backblaze.
At just $6 a month (or $60 a year, $110 for 2 years) for unlimited online storage, Backblaze surpasses most other competing services in terms of sheer value for money.
The company doesn’t impose any limits on upload speeds, which is extremely important because your initial backup is probably already going to take hours or even days without any speed restrictions.
For that monthly fee you can back up an unlimited number of files from one computer and also from an external hard drive.
You can restore files you’ve uploaded to the cloud to mobile devices but you can’t back up from them.
If there’s one annoyance about Backblaze, it’s that any files uploaded from your external hard drive will be automatically deleted from their servers if the drive is disconnected for 30 days.
If you want to try it out, the company offers a 15-day free trial for new users.
A second cloud backup service that’s well worth mentioning is Crashplan.
This used to arguably be the best cloud backup service for most travellers but in 2018 the company decided to abandon the consumer market for the more lucrative business market.
Now instead of a personal plan you can only buy a small business plan, which costs $10 a month per computer for unlimited storage, making it almost twice as expensive as a personal plan with Backblaze.
However the extra monthly cost is somewhat justified as you do get better overall service with Crashplan.
You can backup an unlimited number of external hard drives (instead of just one) and Crashplan also won’t remove files automatically from its servers, even if you delete the files from their backup source. It’ll also keep unlimited file versions available for an indefinite length of time.
Ultimately we think that Backblaze will be the best option for most travellers, but if you have multiple hard drives to back up to the cloud, or wish to always have access to all previous versions of your files, you might be better off with Crashplan.
If you think you might be interested in Crashplan, you can try their 30-day free trial at no risk.
A few general tips for creating data backups
- You should ideally be creating a backup of your photos and videos at the end of every day, even if you didn’t manage to fill the SD card you were shooting with.
- When organizing your backups you’ll probably want to create a new folder for the trip you’re currently on, and then create lots of sub-folders within that main folder to organize your photos according to the location or time they were taken. This makes it much easier to find what you’re looking for when you go back to retrieve something in the future.
- It’s also really important to try opening a few of your backup files after they’ve finished copying, just to make sure that the files are okay and there weren’t any errors in the copying process.
- Be very careful that you don’t accidentally disconnect anything from your laptop while the files are copying from one storage medium to the other, as data can get corrupted this way.
- If you’re trying to back up data to the cloud while you’re travelling it’s usually best to do it overnight at your lodging, as the Wi-Fi network won't be overloaded and file uploading should proceed more rapidly.
- Unless you have a plan with unlimited data, it’s best to wait until you have a Wi-Fi connection before you try to back up anything to the cloud.
How to back up photos and videos from an SD card without a laptop
Above we discussed several ways to back up files from a memory card when carrying a laptop.
But what if you don't own a laptop or you simply don't want to risk travelling with one? Is there still a way to back up those precious files on your SD card while on the go?
Well, luckily the answer is that yes, there are a few ways. But some of the methods are less well-known and will require the use of certain specialized accessories and storage devices.
If you can't travel with a laptop, here are the best workarounds you have at your disposal for backing up from a memory card.
Find a computer
One potential solution if you didn’t have a laptop would be to use one of the computers in a public library, hostel, hotel, airport, or cybercafé as an intermediary for backing up your files.
You might also have access to a computer if you stay with friends or family, or stay in a local's home through couch-surfing, housesitting or a homestay work exchange program.
It's important however to be aware of the risks of viruses when you're plugging in external hard drives, USB sticks and other storage devices into unknown public computers.
Use a camera with built-in Wi-Fi to transfer files to a mobile device
Wi-Fi is now a commonly integrated feature in high-end and mid-range cameras, allowing you to wirelessly back up files from the camera to another device like a phone or tablet.
Usually you set up a new wireless network name and password with the camera itself and then connect your device to that network, or you sometimes connect both the camera and device to another Wi-Fi network, or sometimes Bluetooth is used instead of Wi-Fi.
The drawback with this method is that if your mobile device doesn't possess expandable storage you probably won’t have much free space for copying files onto it.
If your phone does have expandable storage, this method will definitely work, because microSD cards can now go up to a whopping 1 TB. However, such high-capacity cards are very expensive and for that reason alone I wouldn't recommend this backup strategy.
Use special card readers that can transfer files directly from an SD card to your mobile device
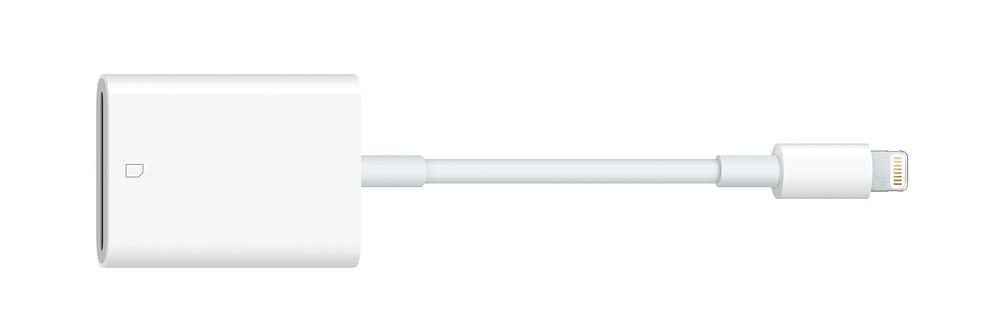
For those with an iPad or iPhone the Apple Lightning to SD Card Camera Reader lets you quickly copy photos from your camera’s SD card to your iPhone or iPad. USB 3 transfer speeds are even supported if you have an iPad Pro.
You just have to plug one end of the cable into your device, insert your SD card into the adapter at the other end, and then use the Photos app (automatically launches) to import any images from the card to your device.
Those with Android phones that have USB OTG (On-The-Go) support can also import files directly to their device from an SD card or microSD card in the same manner as Apple users.
The gadget that makes this possible for Android users is called an OTG card reader and it simply plugs into your phone or tablet via a micro USB or USB Type C connector.
You can also get combination devices like this, which have connectors for both Android and Apple devices and will allow you to import files from an SD card to either.
Again the major downside with this strategy, as with the previous option, is that microSD card storage is relatively expensive and mobile devices are not dedicated data storage devices.
EHDs (external hard drives) with inbuilt SD slots

Some external hard drives now come with inbuilt slots for SD cards, allowing you to directly upload the files from the card onto the hard drive.
One example that stands out is Western Digital’s My Passport Wireless Pro, a portable hard drive with an inbuilt SD card slot that operates at USB 3.0 speeds.
The drive also has a slew of other capabilities, including being able to act as a router, a media streaming device and a 6,400 mAh power bank.
To backup any files on the SD card to the drive all you need to do is insert the card in the inbuilt slot and press a button. It’ll immediately start copying the files to the hard drive while the 4 indicator lights tell you how close the process is to completion.
Also the device is programmed to only copy new files, so every time you insert your SD card it’ll just copy over the images that haven’t already been copied to the drive.
This is an excellent backup option and would probably be our first choice if we weren't travelling with laptops.
File transfer hubs and similar devices

The RavPower Filehub is another very popular solution for backing up files from SD cards to an external hard drive, USB flash drive, smartphone, tablet or other storage device when you don’t have a laptop.
This is a multi-functional device that acts as a wireless travel router (converts a wired hotel Internet connection to a wireless one & bridges and extends an existing hotel Wi-Fi connection), a power bank (6,700 mAh battery), a file transfer hub and a wireless media streaming device.
To back up files from an SD card using the RavPower, it couldn't be any easier thanks to the device's one key backup feature.
Just insert the card into the inbuilt slot on the device, connect an external hard drive, USB flash drive or other storage device, wait for the LED indicators on the RavPower to stop flashing, hold down the SD->USB button until the indicators start flashing again and then just wait until the backup is complete.
Another similar product made for people who like to travel without a laptop is The Gnarbox, which is basically a mini-computer that even has built-in photo and video editing capabilities, allowing you to whip up edits on the fly when you’re without your laptop.
Measuring 6” x 3” x 1.16” and weighing approximately 1.1 lbs, with a 3200 mAh battery, The Gnarbox has inbuilt SD card slots so that you can quickly get your photos backed up from the card without needing a laptop.
All you need to do is launch the app and connect your phone or tablet to the Gnarbox’s Wi-Fi network and then you can easily transfer all the files from your SD card to The Gnarbox.
It comes with 128 GB of its own storage but you can always connect an external hard drive to it if you need additional space.
The Gnarbox will especially appeal to adventurous, outdoor-loving travellers since it’s an extremely rugged hard drive that’s dustproof, shockproof and waterproof to 1 metre for 30 minutes.
All things considered the Gnarbox is a lot more expensive than some of the other options we’ve mentioned and comes with a lot of additional features that you may not need, but it will definitely still appeal to some.
How to back up photos and videos from your phone when travelling

With smartphone cameras becoming as advanced as they are nowadays, many people don’t even bother taking a digital camera with them whenever they go abroad.
But smartphones with high-quality inbuilt cameras are lucrative pickings for thieves, so it’s extremely important that you’re backing up all those snaps if you’re relying on your phone to do all your photography.
If you’ve got a mobile device that’s starting to fill up with irreplaceable photos and videos during a trip, the first thing you ought to do is make sure that all your images are being automatically backed up to Google Photos or iCloud whenever you connect to Wi-Fi.
Within these apps you should be able to find the setting to enable automatic backups over Wi-Fi. It's generally best to leave the option for cellular data backups disabled, unless you have an unlimited data plan.
In addition to automatically creating an online backup, you'll also want to create another backup of all your phone’s images and videos on a physical storage device like a laptop, USB flash drive or external hard drive.
Doing this second backup will allow you to delete all the files from your phone's internal storage or microSD card (which you'll probably need to eventually do anyway as your phone fills up) and still retain two copies of all the files.
It's usually pretty straightforward to copy files from your phone to various physical storage devices if you’re carrying a laptop.
You can connect your phone to your laptop with a USB cable, plug in your USB storage device, and start copying over the files from your phone. You can also just copy the phone files directly to your laptop's internal drive if you have plenty of free space.
If you're trying to connect an Android phone to an Apple laptop via a USB cable you may run into some issues due to the inherent incompatibility of the two operating systems.
The solution here is to download and install the Android File Transfer app on your Mac, and to also enable USB debugging and MTP (media transfer protocol) in your Android phone developer settings.
In Android Pie you will need to go to settings -> system -> about phone -> build number and tap the build number 7 times in quick succession in order to be able to access the developer settings.
But lets say that you're travelling without a laptop. How can you still back up files to a physical data storage device from your phone?
Well one very useful gadget is a USB OTG (On-The-Go) cable, which allows you to turn your phone or tablet into a host, so that USB devices like flash drives, card readers, keyboards etc. can be connected to it.
A USB OTG cable has a male micro USB connector at one end and a female USB adapter at the other end.
If your phone is one of the newer Androids that uses USB Type-C, you can just get an OTG cable with a USB Type-C male connector instead.
Once your pen drive or card reader is connected to your phone via the USB OTG cable, you should be able to copy files between your phone and the storage device.
What about using a USB OTG cable to connect an external hard drive to your Android phone?
Here you may run into problems because your phone may not be able to provide enough juice to start up the drive, especially if it's a high-capacity drive. Most phones only put out about 0.5 A, which is insufficient to power large drives.
The problem can be solved however by connecting a power bank as an additional power source using a special multi-connector OTG cable. You will also need to format your hard drive in the exFAT format. There's a tutorial on how to do all of this here.
One caveat is that for this USB OTG method to work, your Android device must actually support it, and many older devices do not. You can check if yours does by downloading any USB OTG checker app.
If your phone doesn't support USB OTG or you just want a simple way to back up from it to a flash drive, you could also plug a USB Type-C flash drive or one with a micro-USB connector directly into your phone, without the need for any USB adapter.
Also worth mentioning here is the SanDisk Connect Wireless Stick, a USB flash drive (sizes 32 – 256 GB) that works just like a normal USB stick but also allows you to wirelessly copy your camera roll to it from your phone or tablet.
The stick creates its own wireless network, which you can then connect your device to and then use the accompanying app to start copying files over to it.
What's our file backup system?
In most of the countries where we’ve been travelling the Internet is too slow or unreliable and we haven’t been able to rely on cloud backups, even though we ideally should be doing them.
We also have way too many RAW photos and videos to keep any more than a small fraction of them on our laptops, so we don’t really use our laptops for file storage.
So the solution that works best for us at the moment is so keep copies of all our photos and videos on two external hard drives, and to protect those hard drives as best we can inside a sturdy electronics case.
Putting files into permanent storage when you get home

When you get home from your trip, you’ll have an opportunity to back up all your photos and videos to a more permanent storage location.
The first thing you might want to do is to copy all the images from all your SD cards and mobile devices onto your desktop computer (if you have one).
Everyone has their own system of organizing their files, so how you go about it really comes down to your own personal preference.
Some people prefer to arrange files chronologically whereas others prefer to organize them according to the country or destination that they are associated with.
After copying files to your desktop computer, you may then want to copy them to a permanent data storage device, such as a Drobo.
Made by Drobo, Inc. the Drobo is a consumer RAID (redundant array of independent/inexpensive disks) system that provides a reliable, easy-to-use, expandable data storage solution for both Windows and Mac users.
It's designed to automate the entire process of protecting your data, allowing you to set it and forget it. This is in contrast to traditional RAID systems, which require a lot of initial configuring and further management on an ongoing basis.
Drobos look like small black boxes with several receiving bays for popping your hard drives into. They allow you to create one large storage pool from all your storage devices.
Drobos come in a wide range of sizes, from the highly compact 4-drive units with Thunderbolt connectivity to the largest 12-bay, rack-mounted storage arrays.
The units have various ports such as Thunderbolt, FireWire 800, USB 3.0, iSCSI, Ethernet or eSATA so that they can be easily connected to a computer for transferring files.
Drobo protects your data by intelligently spreading it across all of the hard drives that you have inserted into it.
In the event that one of the drives should fail, you simply swap out the failed drive for a new one and you won’t lose any of your precious data.
You can even enable dual redundancy with your Drobo, which means that even in the rare event that two hard drives fail at the exact same time, your data will still be protected.
Depending on the model, a Drobo can hold up to 36 TB using any combination of standard 3.5" hard drives or 2.5" drives for the Drobo Mini.
It's thanks to Drobo's BeyondRaid technology that you can mix and match different hard drives, no matter what the drive's capacity or brand, and you can even use SSDs.
If you want to expand your Drobo's storage capacity at any point, you can connect additional drives or swap out any of the drives for larger ones if all the bays are filled.
Some very serious photographers and travel filmmakers take things a step further by keeping additional Drobos in other rooms of their home or by keeping a second Drobo in a neighbour’s house in case the one in their own home is destroyed or burgled.
Once you’re home you’ll also probably have access to better Internet so you might also consider backing up all of your photos and videos to cloud storage.
Conclusion
No matter what kind of traveller you are, if you’re taking photos or documenting stuff on the road, you need to be backing up your files as you go.
With hard drive storage now costing less than $0.03 per GB (as opposed to $500,000 per GB in 1981) and unlimited cloud storage available from $6 a month, it’s cheaper to back up your data now than ever before, so there’s really no excuse for leaving your files vulnerable to disaster.
Travelling with a laptop makes backing up your photos and videos much easier, but we also saw in the article how there are still viable solutions for those who don’t want to risk travelling with one.
Yes backups are a bit of a chore, but they'll protect you from something a hell of a lot worse further down the line. Don't neglect them out of laziness!
If you liked this article, please share it with other travellers. We’d love to know what is your method for backing up your photos and videos when you’re travelling? Please leave us a comment below with your thoughts on this matter.


JOIN OUR LIST
SUPPORT US
FOLLOW US
ABOUT US
Our names are Eoghan and Jili and we hail from Ireland and India respectively.
We are two ardent shoestring budget adventure travellers and have been travelling throughout Asia continuously for the past few years.
Having accrued such a wealth of stories and knowledge from our extraordinary and transformative journey, our mission is now to share everything we've experienced and all of the lessons we've learned with our readers.
Do make sure to subscribe above in order to receive our free e-mail updates and exclusive travel tips & hints. If you would like to learn more about our story, philosophy and mission, please visit our about page.
Never stop travelling!
FOLLOW US ON FACEBOOK
FOLLOW US ON PINTEREST
