-lw-scaled.png.png)
Summiting Mount Merapi: How To Climb Indonesia's Most Active Volcano With No Guide
After spending several weeks travelling through Java island in Indonesia, we had visited and experienced many of the island's keystone sights and tourist attractions.
We had visited a few stinking craters in the Dieng Plateau, visited tea plantations, hot springs and a surreal crater lake in Bandung, investigated the ancient Hindu and Buddhist temples of Prambanan and Borobudur near Yogkakarta and yet.... we still felt that we hadn't yet fully romanced with the island's true essence.
To satiate our hunger for adventure, we needed to climb one of Java's giant smoking volcanoes from the foot of the mountain all the way to the crater at the summit. It wasn't enough for us to climb a dormant volcano either; it would have to be one that was threatening to erupt at any moment.
While sojourning in the city of Yogyakarta, the main tourist hub of Java, our attention turned to an explosive volcanic mountain called Mount Merapi, located not far beyond the city limits.
This volcano looked like it might just be able to satiate our hunger for adventure. Thus it wasn’t long before we had mentally committed to the somewhat daunting task of climbing to the summit of the volcano and in our characteristic fashion, we were determined to tackle it without a guide.
This detailed guide covers the ins and outs of summiting Mount Merapi independently, without the aid of a hiking guide. However, the DIY approach definitely isn't for everyone.
If you'd prefer to pay a bit extra and hire a professional local tour guide, including hotel pick-up, free breakfast and free bottled water, you can book your Mt. Merapi hiking tour right here.
Mount Merapi - Get to know it
Mount Merapi is an ominous looking stratovolcano, located about 29 km to the north of the city of Yogyakarta in central Java, Indonesia. The volcano's conical shape is reminiscent of Mount Fuji in Japan, although it is not as high as Fuji.
The Javanese name, Gunung Merapi, literally translates to ‘mountain of fire’ and it is Indonesia’s most active and dangerous volcano. It is not to be confused with Gunung Marapi, which is the most active volcano in Sumatra and almost the exact same height as Gunung Merapi!
The summit of Merapi sits at an estimated elevation of 2,930 m above sea level and the mountain is flanked by numerous small village communities, some of these situated as high as 1,700m above sea level.
Despite the constant threat of being buried under volcanic ash, the population density around the volcano is 690 people per sq km!
The area around Mount Merapi was declared a national park in 2004, with a total coverage of 6,410 hectares. This was a very controversial move by the Ministry of Forestry however, as they didn't consult any of the local residents beforehand.
There are many myths and superstitions attached to Mount Merapi, especially among the local people living at the foot of the mountain. For example, some people believe that one of the palaces used by the ruler's of the spirit world lies inside the mountain and that ancestral spirits also live within this palace as royal servants.
The mountain itself is also believed to have a spirit and locals often bring offerings from the kraton (the sultan's palace in Yogyakarta) on the anniversary of the Sultan of Yogyakarta's coronation to appease the mountain's wrath.
Many of the local people believe that you should ask the mountain for forgiveness if you urinate or use foul language while climbing it.
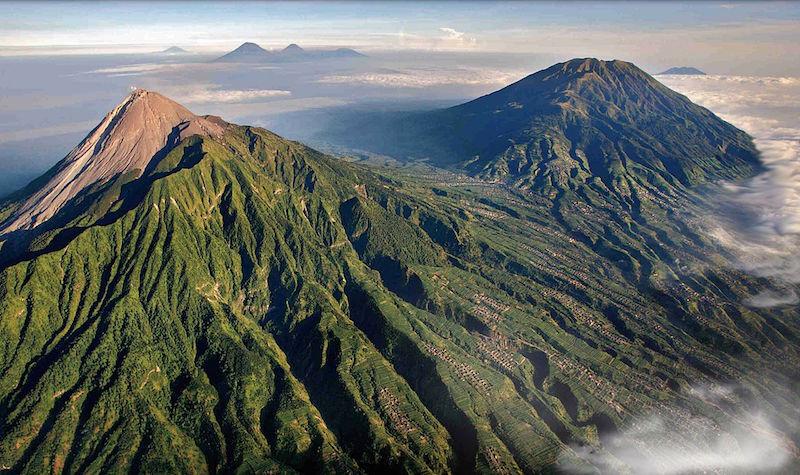
Just 9 km to the north of Gunung Merapi is another very impressive volcanic mountain called Gunung Merbabu and its presence makes for spectacular photographs from the crater summit of Mt. Merapi at sunrise.
At an elevation of 3,145 m above sea level, the summit of Merbabu is slightly higher than that of Merapi, although Merbabu is a dormant volcano, having last erupted in 1560 and 1797. The name loosely translates to 'mountain of ash.'
.jpg)
A violent history
Being such an active and explosive volcano, Mt. Merapi has a very colourful history and many of its past eruptions have caused numerous fatalities and displaced thousands of people from their homelands.
The volcano, it is believed, has been erupting for over 400,000 years and it now typically erupts every 2-3 years, with larger eruptions occurring every 10-15 years.
Going back 1,000 years in history, it may well have been responsible for the abandonment of Borobudur and for the downfall of the Hindu Mataram Kingdom in the year 1006.
During an eruption in November 1994, a pyroclastic flow raced down the western flank of the mountain towards the village of Muntilan and killed 27 villagers, who were unable to evacuate in time. Since then there have been several more pyroclastic flows, lava flows and volcanic earthquakes.
However, the two most recent eruptions of Mount Merapi occured in 2006 and in 2010.
The 2006 eruption produced lava flows and pyroclastic flows (known as wedhus gembel or ‘shaggy goats’ by the Javanese), causing two fatalities. The real damage however occurred a short time later when a 6.3 magnitude earthquake struck 50 km to the south-west of the volcano, causing around 5,000 fatalities and leaving 200,000 people homeless in the region.
The 2010 eruption on October 25th was preceded by hundreds of volcanic earthquakes and rising magma levels, ultimately killing over 300 people and displacing more than 300,000 from their homes. Many people were left scarred with severe burns and lingering psychological trauma after the event.
Getting to the trailhead
.jpg)
Mount Merapi is tackled by most people from the small village of Selo, located at the foot of the mountain on its northern face. Selo sits at an elevation of about 1,600 m above sea level, putting it about 1,300 m below the summit of the volcano.
Selo can be reached from Yogyakarta very inexpensively (albeit somewhat inconveniently) by public transport, using a combination of buses and angkots. Here is the exact route we took:
Yogyakarta -> Kartasura -> Boyolali -> Selo.
You can use the Trans Jogja rapid transit bus service (only 4,000 IDR) to get from Jalan Malioboro in Yogyakarta to the Yogyakarta Bus Station, where there should buses leaving for Kartasura on a fairly regular basis.
Once you reach Kartasura you'll need to dismount the bus at the t-junction and you should be able to catch an angkot or another bus to Boyolali from here.
For the last leg between Boyolali and Selo, you should be able to catch a mini-bus but if not you may need to hitchhike like we did.
Don’t worry about that though because it’s very easy to snag a ride with one of the pickup trucks that regularly ply this route.
Another affordable option is to hire a motorcycle in Yogyakarta and ride it to Selo. Just take a small daypack with you on the bike and if you have a larger primary backpack, you can ask your guesthouse to look after it until you get back to Yogyakarta.
If you're reading this guide having yet to reach Yogyakarta, we imagine that you'll want to spend a few nights there first before heading on towards Selo to climb Mt. Merapi.
Buses to Yogyakarta from various places in Java can be easily booked with 12Go. Enter your origin, destination and date of travel in the form below if you wish to arrange your transportation online:
The best area to look for affordable accommodation in Yogyakarta is around Jalan Sosrowijayan, just off the main thoroughfare of Jalan Malioboro in the city centre. You'll find a high density of small, agreeable guesthouses catering primarily to foreign tourists in this part of the city.
If you want to reserve a room in advance of your arrival you can do so by booking online:
An alternative route to the summit from Kinahrejo on the southern side of the mountain is also possible, but is forbidden by the authorities because it is considered too dangerous.
We started from Selo because we didn’t want to take any major risks on our first attempt at climbing the mountain.
Once you reach Selo, a small side road branches off the main road running through the village and leads uphill along an asphalt road for about 1.5km to the trailhead at a viewpoint known as New Selo.
About halfway up this hill, you will meet a registration checkpoint where you will be forced to buy an overpriced 'foreigner' ticket. We've written more below on how to avoid running into the ticket mafia.
It is very much possible to overnight in Selo if you're too tired to tackle Merapi on the same day that you arrive. You'll find a few homestays here with very basic facilities.
If you want to overnight in Selo before climbing Mt. Merapi the following day, you might want to book online in advance, as there is a shortage of properties in Selo.
We actually decided to spend one night in Selo and stayed in a very basic, non-descript guesthouse along the main drag, where the owner started chatting to us and told us his nickname was 'superman' was because he had climbed Mount Merapi hundreds of times in his youth.
The best time of year to climb
.png)
The summer months (May-October) are the driest months for climbing Gunung Merapi. During the wet season (November-April), there's a higher chance of having the expedition beset by bad weather and trails become more slippery following heavy rains. However, you can still climb it in the wet season and many people do.
How to approach the ascent
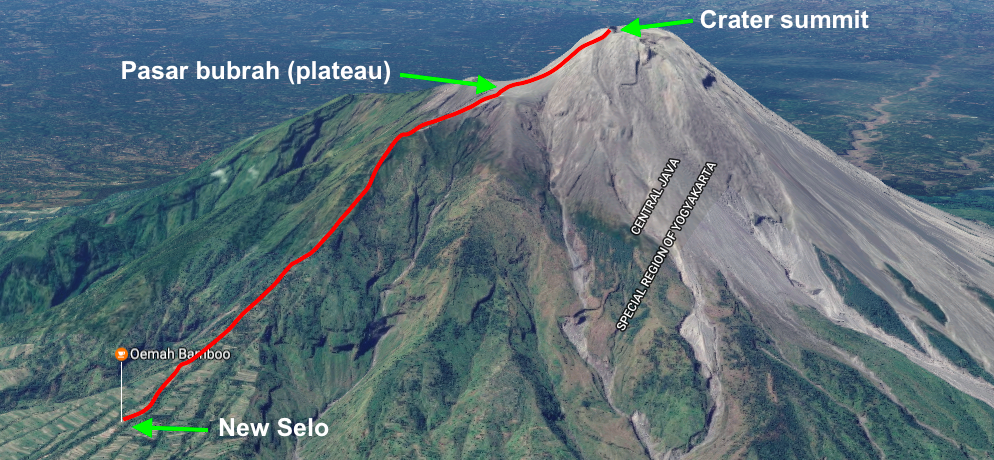
Since the distance from New Selo to the crater summit is only 3.5 km and the elevation gain is a doable 1,356 m, many people tackle Mount Merapi as a very challenging day-hike and this was our approach as well.
The ascent to the summit should take you anywhere between 3-7 hours, depending on your hiking ability and fitness level, with the descent taking a little less time for most people.
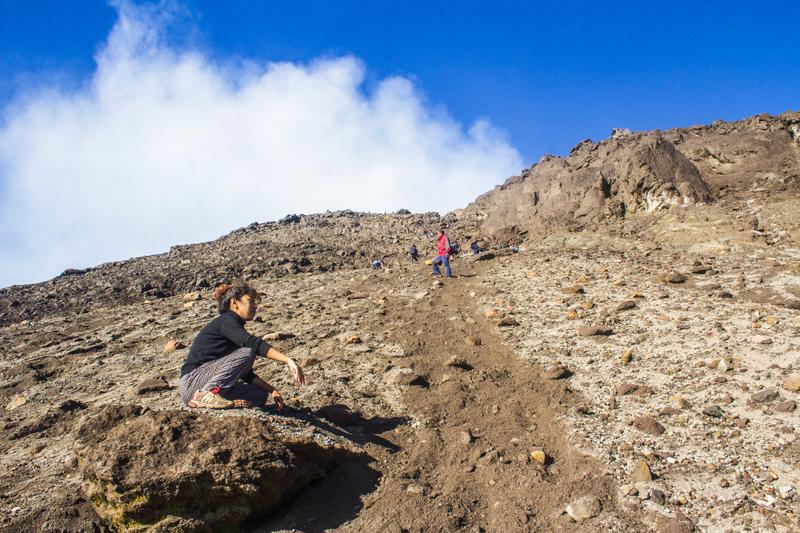
Just be warned that the climb is generally quite steep and strenuous with broken ground and uneven terrain. The final push to the summit is tremendously steep and involves climbing up a slope of loose shifting scree and volcanic sand.
If you wish to be positioned at the summit for the sunrise, as most people seem to aim for, then we’d recommend that you set out no later than 1 a.m from New Selo. Bring a good headlamp or flashlight with spare batteries because you’ll be hiking in the dark if you attempt this.
Otherwise, a very early morning start (5 a.m) would be best to avoid hiking uphill in the midday heat. You should be back down in Selo by mid-afternoon at the latest if you do it this way and won't have to descend in the darkness.
A third option that seems to be popular with adventurous Indonesian backpackers is to set out in the late afternoon or evening, camp in a tent on the mountain overnight and then tackle the final push to the summit the following morning.
If you feel that you don't have adequate fitness to reach the summit in one go or just want to spend some extra time on the mountain (stargazing perhaps), you might give this approach a try.
No guide is necessary
Guides are not necessary or compulsory for Mount Merapi because the trail is easy enough to follow for the most part, although you will need to care not to lose the correct track in the forested lower reaches of the mountain.
If not taking a guide you do however need to keep yourself briefed on the latest safety reports and warning status of the mountain. It is an active volcano after all! Locals in Selo will know the situation best so ask around.
If climbing without a guide, we recommend you go with a friend, although if going it alone there is still a good chance you'll run into a group of other hikers if you're trying to reach the summit for the sunrise, especially if it's a weekend.
The guides however are well aware of people trying to tag along with their group, so you should probably just try to avoid the guided groups altogether. Just don't become another statistic like the Indonesian student who got lost in September 2002 and fell down a ravine to his death.
If you absolutely must have a guide you can try to hire one from Selo (we got a few offers) or just ask various travel agencies in Yogyakarta to put you in contact with one.
Prices are variable and negotiable but it will be cheaper if you can split the cost with a few other people.
Expect to pay around 300,000 Rp. per person for a group of 2 or 3 people. The price will jump to about 450,000 Rp. if you're planning to camp overnight. That's why it's much better to do it without a guide, if you can.
What to pack for the hike
Assuming you're tackling the mountain as a day hike, you won't need to pack too much and the less you pack the better, because the climb is already arduous enough without the burden of a heavy backpack.
If you're planning to camp, tents seem to be the most popular option and there are also plenty of places to string up a hammock and tarpaulin, even in the upper reaches. Make sure you bring a warm sleeping bag and sleeping mat too because it gets quite chilly up there at night.
If climbing without a guide and especially if hiking at night to make it to the summit for the sunrise, take some means of navigation, just to get you up above the treeline. We recommend a smartphone with GPS and a downloaded map of Java island with the maps.me offline navigation app. This app is the best we've found for accurate GPS hiking trails.
Be warned that there are very few, if any possibilities for obtaining drinking water along the trail to the summit. Any streams or springs you do find will probably be sulphurous and unfit for drinking so you should make sure you bring plenty of drinking water and if camping overnight, bring loads.
Here is a list of the essentials:
- Day pack with raincover
- Decent hiking shoes
- Headlamp
- Spare batteries for headlamp
- Waterproof poncho
- 3 litres of water
- High-calorie foods (chocolate, cookies, nuts, bananas, dried fruit etc.)
- Smartphone (use for navigation with GPS and a downloaded map of Java with the maps.me app)
- Spare smartphone battery or power bank
- Warm pullover for the chilly summit
- Camera for the spectacular photo opportunities
If you have bad knees you might also want to bring hiking poles as the climb is very steep.
How to avoid the Mount Merapi entrance fee?
At the time of writing, the entrance fee for foreigners was an outrageous 150,000 Rp. per person and it apparently gets hiked to 225,000 Rp. at the weekends. The Indonesians pay about 1/10 of this and you really shouldn’t be discriminated against as a foreigner.
We were actually able to avoid paying the entrance fee to the ticket mafia by casually walking past the ticket checkpoint at about 1 a.m when nobody was apparently there to stop us.
We then ran into a group of hikers leaving from New Selo with guides and one of the guides soon realized that we weren't part of the group.
He asked us if we had bought tickets and we told him we had (lying of course). When we were able to quote him the correct price for the ticket he was seemingly convinced and allowed us to continue.
A summary of the route to the summit
The climb begins from New Selo on a concrete path that passes through an agricultural area and soon starts to rise up steeply through forested terrain. Here you will often find yourself walking inside deep ruts in the trail and hiking up steep mud paths criss-crossed by tree roots.
Macaques, forest birds and beautiful wildflowers may be spotted here along this forested stretch if hiking during the day time, although if you're trying to catch the sunrise, you'll have to wait until the descent to see this part of the mountain properly. There are a couple of checkpoints and a shelter along the way where you can take a breather and have a water break.
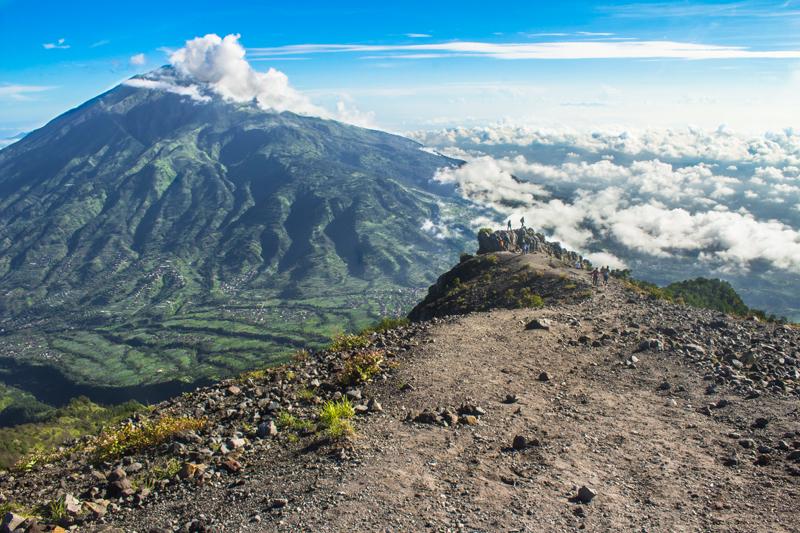
After a few hours of hiking and considerable altitude gain, the trees start to become shorter and smaller, the vegetation becomes thinner and you will find yourself walking along a fairly narrow ridge. The spectacular views begin around here and continuing up along this ridge, you will eventually be brought above the tree line.
Just above the tree line, there's a great opportunity to view several other volcanoes far off to the west. The most distant peak is Gunung Slamet and the two closer ones are Gunung Sumbing and Gunung Sindoro. Beyond Sindoro to the northwest lies the Dieng Plateau volcanic region.
.jpg)
From here, if you look to your left, you can also see a ridge running off to the east with interesting lava channels carved out of the rocky slope below it.
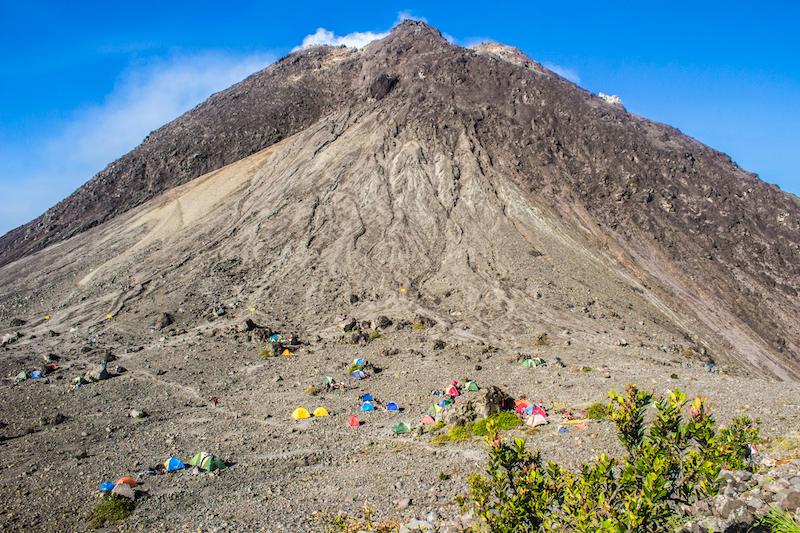
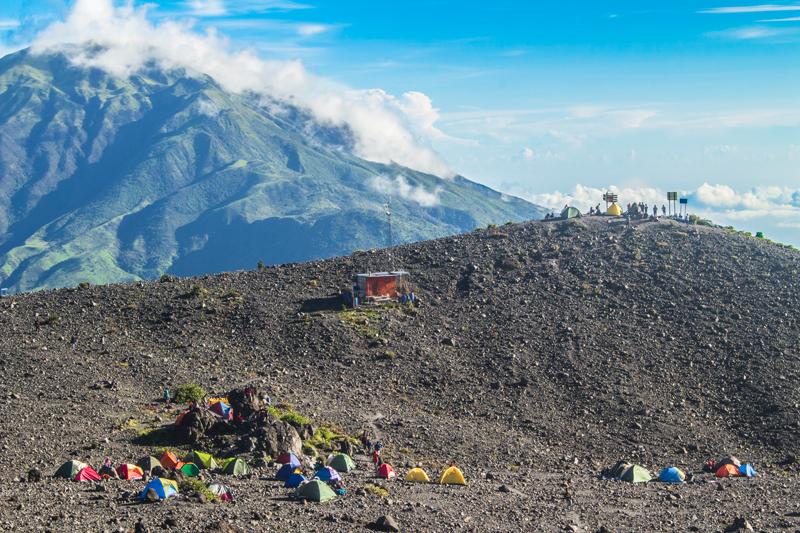
Continuing onwards, the trail continues to climb upwards on rocky ground to a large plateau named 'Pasar Bubrah', sitting at an elevation of about 2,640m.
The lunar landscape of Pasar Bubrah is quite surreal and many people may be camped here in colourful tents when you arrive. Some guides may stop here at the plateau, depending on the current status of the volcano.
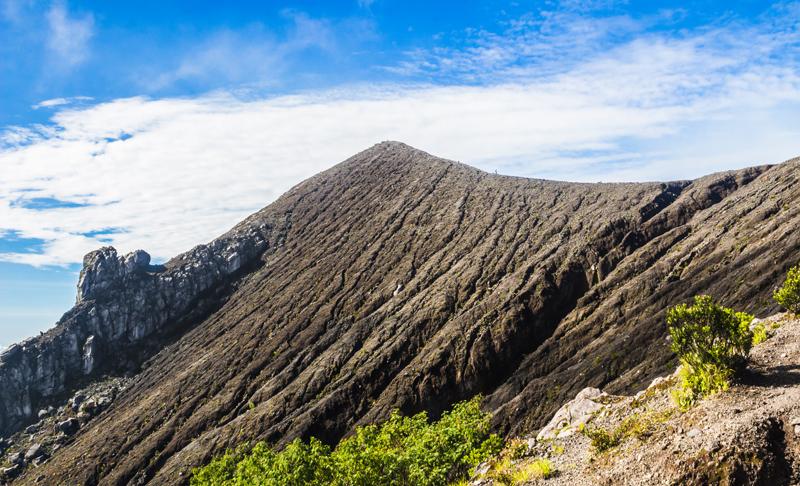
From here you can see the final obstacle to the crater summit; a very steep climb of 300 vertical metres on loose scree and sandy material.
.jpg)
This final push to the crater summit is very difficult for non-hikers and many people give up here, tragically never making it to the summit. The loose scree and shifting volcanic sand mean that you’re sliding one step backwards for every two steps forwards, which is very frustrating.
It's really worth persevering up this final stretch however because the rewards are well worth the struggle, especially if you haven't already missed the sunrise.
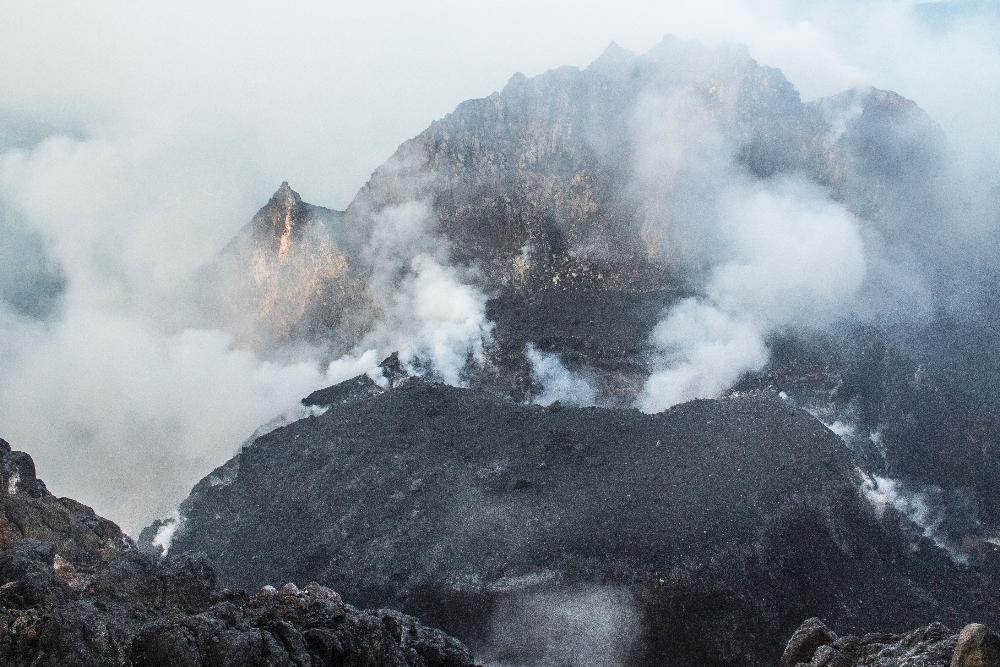
Once you reach the true summit you can peer inside the crater and witness the 'smoke' (actually a mixture of steam and other volcanic gases like carbon dioxide, sulphur dioxide and hydrogen sulphide) emerging from the rocks.
The summit ridge, which curves along the crater edge, is very narrow and steep on either side so great caution is advised when walking up here. Tragically, a young 21 year-old man from Yogyakarta died here in 2015 when he attempted to take the perfect selfie while standing too close to the edge of the crater.
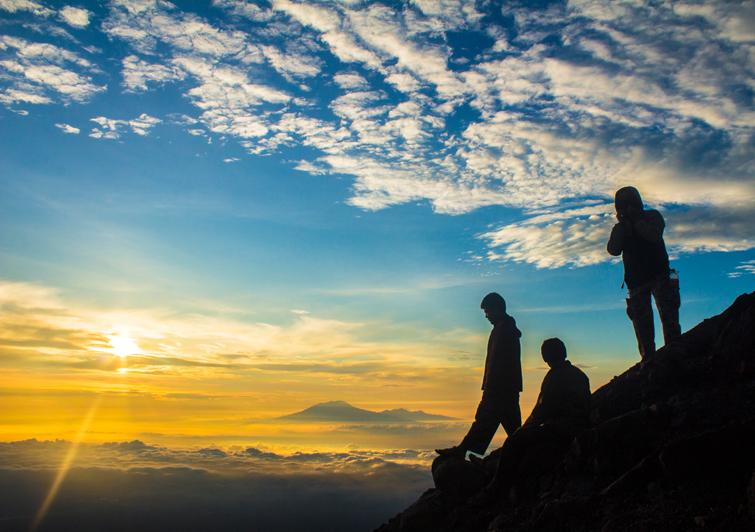
If you arrive before the sunrise then it's just a waiting game in the chilly pre-dawn air. We managed to somehow arrive perfectly on time for it and the sun was just peeping above the horizon at the very moment we set foot upon the summit ridge.
A few other hikers, both Asian and Western, had arrived at the peak before us but their presence didn't spoil the magic of the occasion. It was truly a momentous occasion, standing there upon the summit of Indonesia's most active volcano, as our chilled bones welcomed the first warming rays of the morning sun.
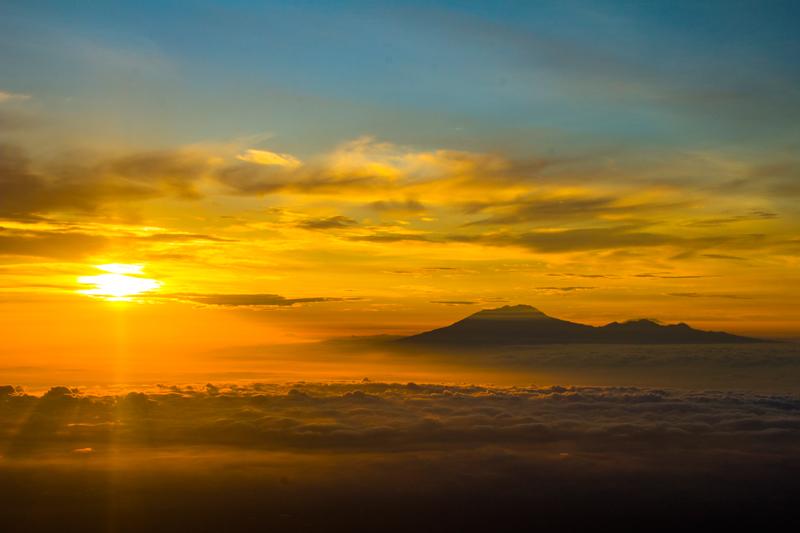
As we gazed out towards the east, we could see that a spectacular cloud inversion had formed beneath us and a seemingly endless sea of clouds extended as far as the eye could see.
The sun rose just to the left of the silhouetted Gunung Lawu, another impressive volcano far off to the east. We were thankful to have been blessed with such a clear morning and perfect sunrise.
Following the glorious sunrise, the pre-dawn darkness that hung over the valley below was rapidly lifting, revealing stunning views of the formidable looking Gunung Merbabu to the north and the plateau below where the hikers had pitched their tents.
We could also see glimpses of Mount Telomoyo and Gunung Ungaran beyond, peeping out from behind Merbabu.

The descent back to Selo
After reaching the summit and savouring that precious moment for as long as you feel you need to, you will inevitably have to begin the long descent back down to Selo, at the foot of the mountain.
The descent should be quicker than the ascent, perhaps taking you only two thirds the time it took to ascend. However, be careful and don’t rush it. You will probably land on your butt a few times coming back down the steep scree slope below the summit but that's okay. Just descend as carefully as possible to avoid taking a tumble down the mountain!
We saw an injured young man with torn trousers hobbling down the mountain with the assistance of a guide and it's likely that his injury occurred due to his overconfidence during the descent.
On the way back down you get an entirely different perspective of the plateau below, which looks quite dramatic against the backdrop of Mount Merbabu.
When during our descent we reached the ridge below the treeline, we found an unattended red hammock set up at a vantage point overlooking the same incredible cloud inversion that we had first seen from the summit earlier in the morning.
It was the perfect spot to stop and admire the beautiful view one last time before descending into the thicker forest below.
.jpg)
Because we were pretty spent from the ascent, coming back down wasn't the easiest task in the world but we managed it well enough. Our feet were definitely beginning to develop some hotspots but thankfully no blisters developed before we reached New Selo at the bottom.
Watch video
We have a few clips of our Mount Merapi experience at the end of our Yogyakarta video. Just skip to 4:51 in the video if you don't want to see the rest.
A final word
Climbing Gunung Merapi is no doubt an immense struggle, especially the final push to the summit up that incredibly steep, seemingly never-ending slope of shifting scree and volcanic sand.
However, we can absolutely guarantee you that the spectacular sunrise and extraordinary views across the island of Java make it all worthwhile.
What's more, it's an achievement to be truly proud of and the memories of climbing the most active volcano in all of Indonesia will surely stay with you for a lifetime.
After reading this guide, you should now be fully prepared to take on the mountain. The next thing is to go and climb it once you get the opportunity. We hope you enjoy it and experience beautiful, clear weather and have fabulous views as we did.
Recommended Guidebook: Lonely Planet Indonesia
Please let us know how was your experience and if you enjoyed it as much as we did in the comments section below!

JOIN OUR LIST
SUPPORT US
FOLLOW US
ABOUT US
Our names are Eoghan and Jili and we hail from Ireland and India respectively.
We are two ardent shoestring budget adventure travellers and have been travelling throughout Asia continuously for the past few years.
Having accrued such a wealth of stories and knowledge from our extraordinary and transformative journey, our mission is now to share everything we've experienced and all of the lessons we've learned with our readers.
Do make sure to subscribe above in order to receive our free e-mail updates and exclusive travel tips & hints. If you would like to learn more about our story, philosophy and mission, please visit our about page.
Never stop travelling!
FOLLOW US ON FACEBOOK
FOLLOW US ON PINTEREST
